Lineage - General API Quick Start Guide
Requirements
Role
The use of this API requires the role of a Source Admin or Server Admin.
Supported Lineage Versions
This API supports both Lineage v2 or Lineage v3.
Overview
This article explains how to use the Lineage & Dataflows Overview API with several examples.
This API allows you to create paths between source and target data and dataflow objects to represent the ETL procedures transforming source data into target data.
A path is an array that specifies the details of where data is flowing from where. There is no requirement to designate objects as "source" or "target": the order of the objects in a path sets the direction of the data flow.
The Lineage API can be used to create Dataflow objects, add lineage links between tables and columns, and do both at the same time. In this guide, we'll do this step by step, first building some simple, more complex diagrams.
Use Case
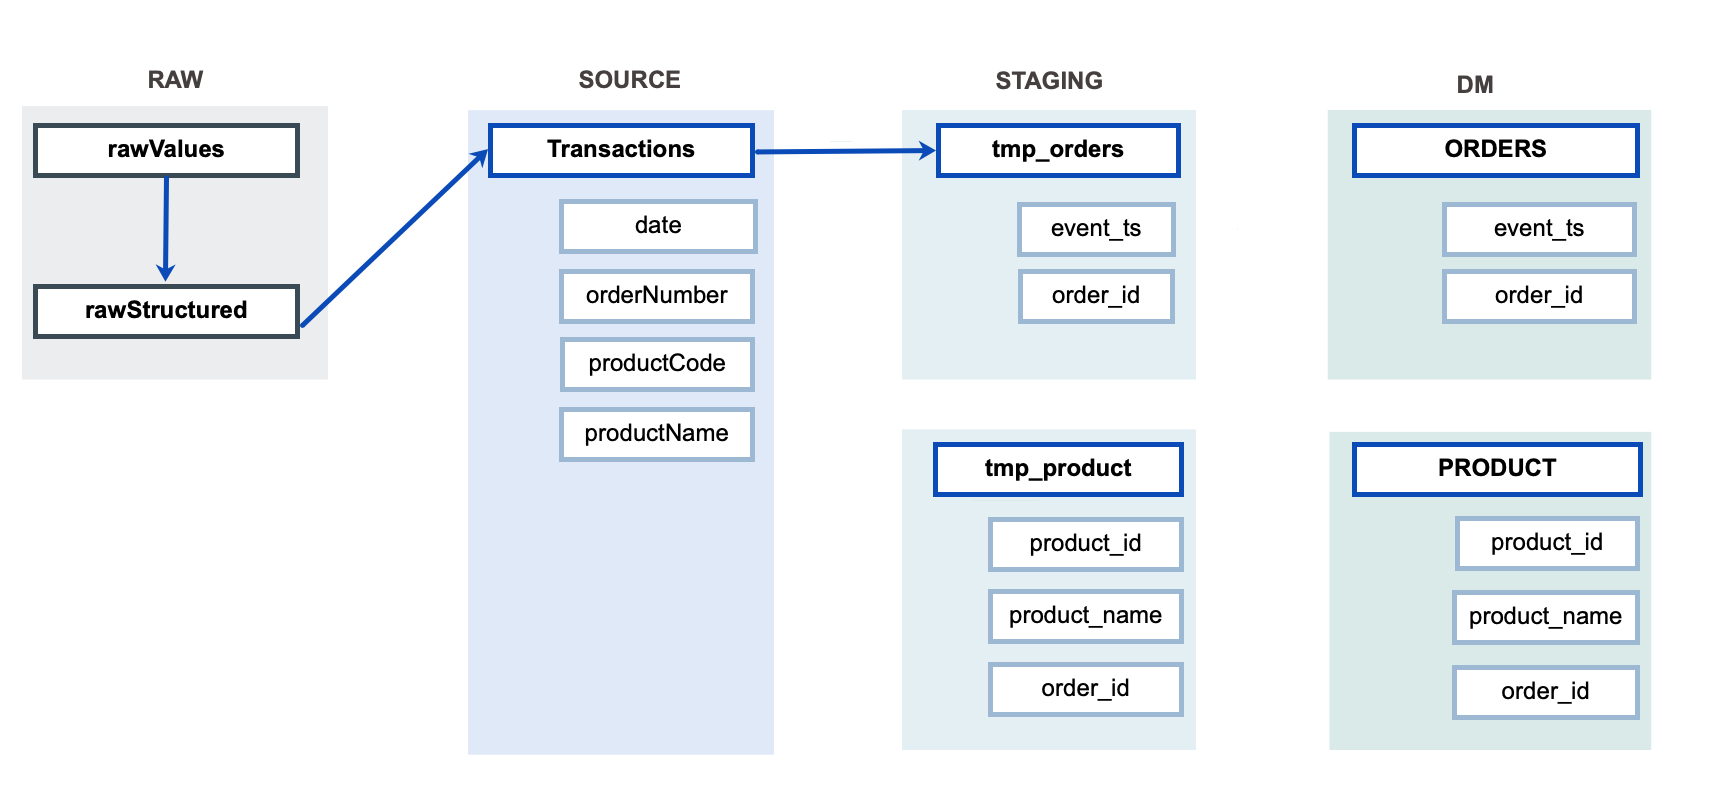
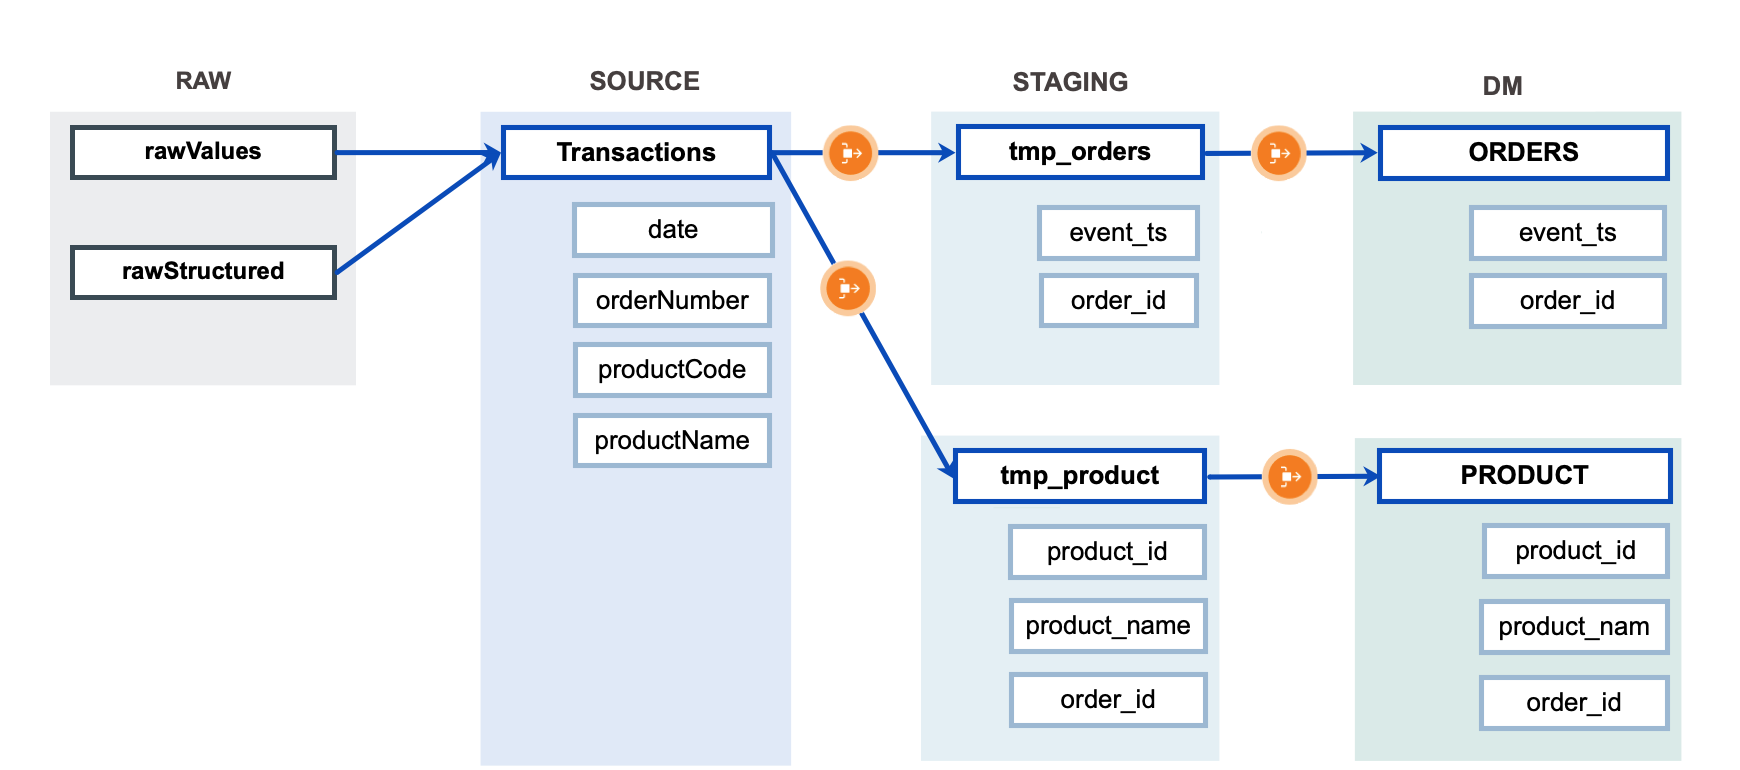
Assume that we are a company selling products. We have an ETL process for transforming the raw data (SOURCE) and loading it into our analytical data mart (DM). We transform the source data in a staging environment (STAGING), dividing one source table Transactions into two target tables ORDERS and PRODUCT :
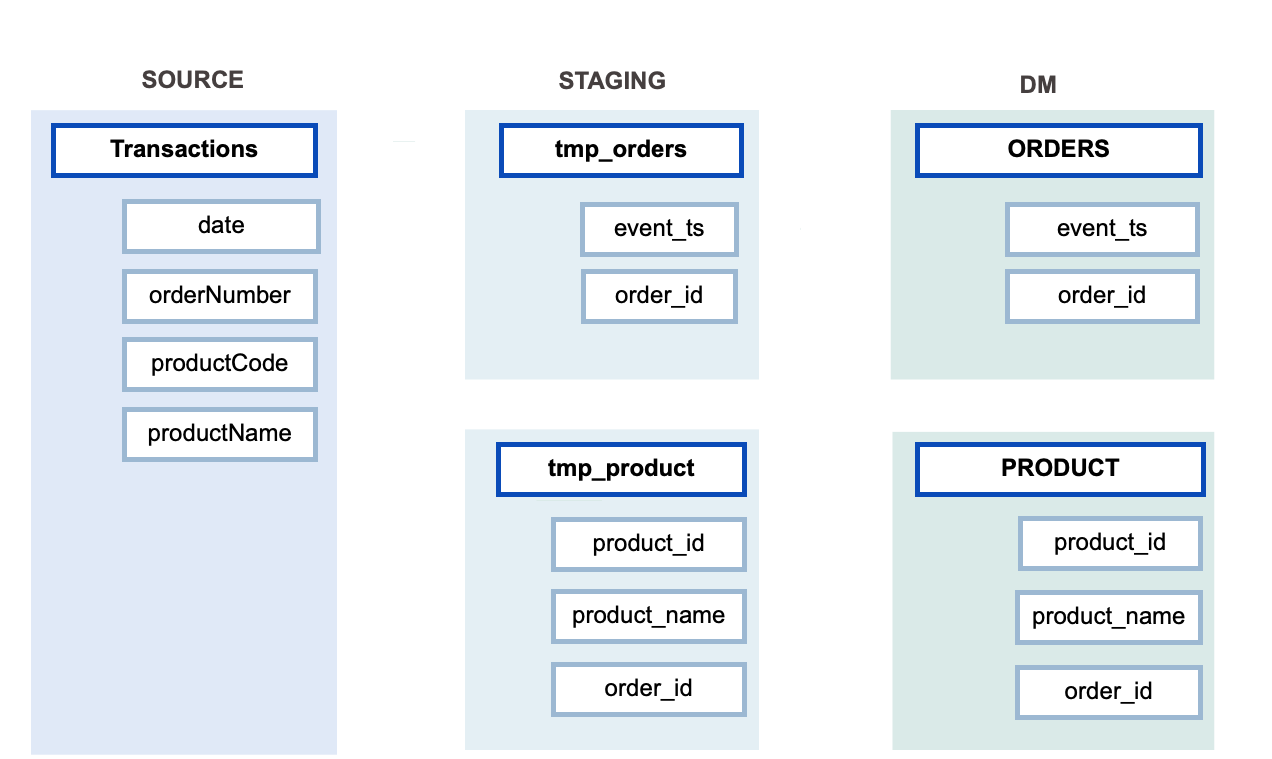
Load this metadata into Alation then document the data flow by adding lineage.
Loading Initial Metadata
First, load some initial metadata into the SOURCE, STAGING, and DM schemas of a Virtual Data Source (VDS) using the Virtual Data Source. In this example, we'll use Postman to create API requests.
ImportantIn all examples below remember to substitute placeholder values with your actual values.
Steps
- Make sure Lineage v2 or Lineage v3 has been enabled.
- In Alation, create a Virtual Data Source (VDS), for example, of DB2 type: Sources > Add > Virtual Data Source. See Adding a Data Source.
- In Postman, create a POST request to add the technical metadata to Alation, placing your token in the header and substituting<DOMAIN>with your Alation address and<DS_ID>with the data source ID of your new VDS:
https://<ALATION_DOMAIN>/api/v1/bulk_metadata/extraction/<DS_ID>?remove_not_seen=true
NoteYou can generate the API token in Alation: Admin Settings > Miscellaneous > Regenerate Token.
The data source ID can be obtained from the URL of the catalog page of the object. For example, in the URL for a data source:
https://alation.alationcatalog.com/data/28/
- 28 is the ID of this data source.
- data is the object type for data source objects
Request Body
{"key": "<DS_ID>.SOURCE"}
{"key": "<DS_ID>.STAGING"}
{"key": "<DS_ID>.DM"}
{"key": "<DS_ID>.SOURCE.Transactions", "table_type": "TABLE"}
{"key": "<DS_ID>.STAGING.tmp_orders", "table_type": "TABLE"}
{"key": "<DS_ID>.STAGING.tmp_product", "table_type": "TABLE"}
{"key": "<DS_ID>.DM.ORDERS", "table_type": "TABLE"}
{"key": "<DS_ID>.DM.PRODUCT", "table_type": "TABLE"}
{"key": "<DS_ID>.SOURCE.Transactions.date", "column_type": "date"}
{"key": "<DS_ID>.SOURCE.Transactions.orderNumber", "column_type":     "int"}
{"key": "<DS_ID>.SOURCE.Transactions.productCode", "column_type":     "int"}
{"key": "<DS_ID>.SOURCE.Transactions.productName", "column_type":     "string"}
{"key": "<DS_ID>.STAGING.tmp_orders.event_ts", "column_type": "date"}
{"key": "<DS_ID>.STAGING.tmp_orders.order_id", "column_type": "int"}
{"key": "<DS_ID>.STAGING.tmp_product.product_id", "column_type":      "int"}
{"key": "<DS_ID>.STAGING.tmp_product.product_name", "column_type":    "string"}
{"key": "<DS_ID>.STAGING.tmp_product.order_id", "column_type": "int"}
{"key": "<DS_ID>.DM.ORDERS.event_ts", "column_type": "date"}
{"key": "<DS_ID>.DM.ORDERS.order_id", "column_type": "int"}
{"key": "<DS_ID>.DM.PRODUCT.product_id", "column_type": "int"}
{"key": "<DS_ID>.DM.PRODUCT.product_name", "column_type": "string"}
{"key": "<DS_ID>.DM.PRODUCT.order_id", "column_type": "int"}
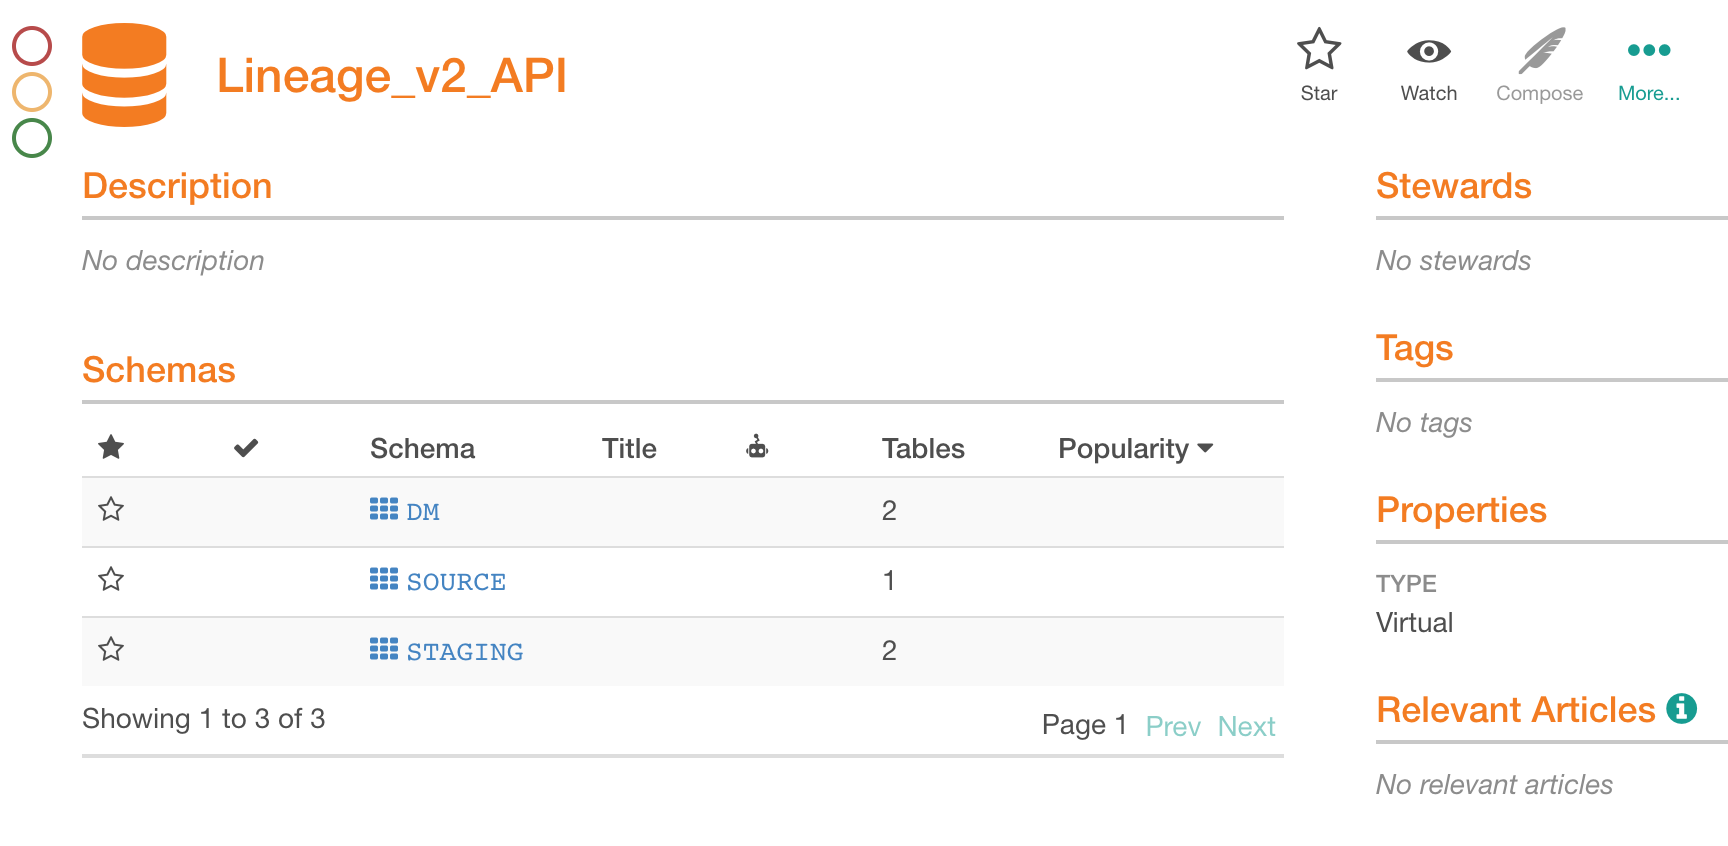
When done, in the data source in Alation you will see the following data:
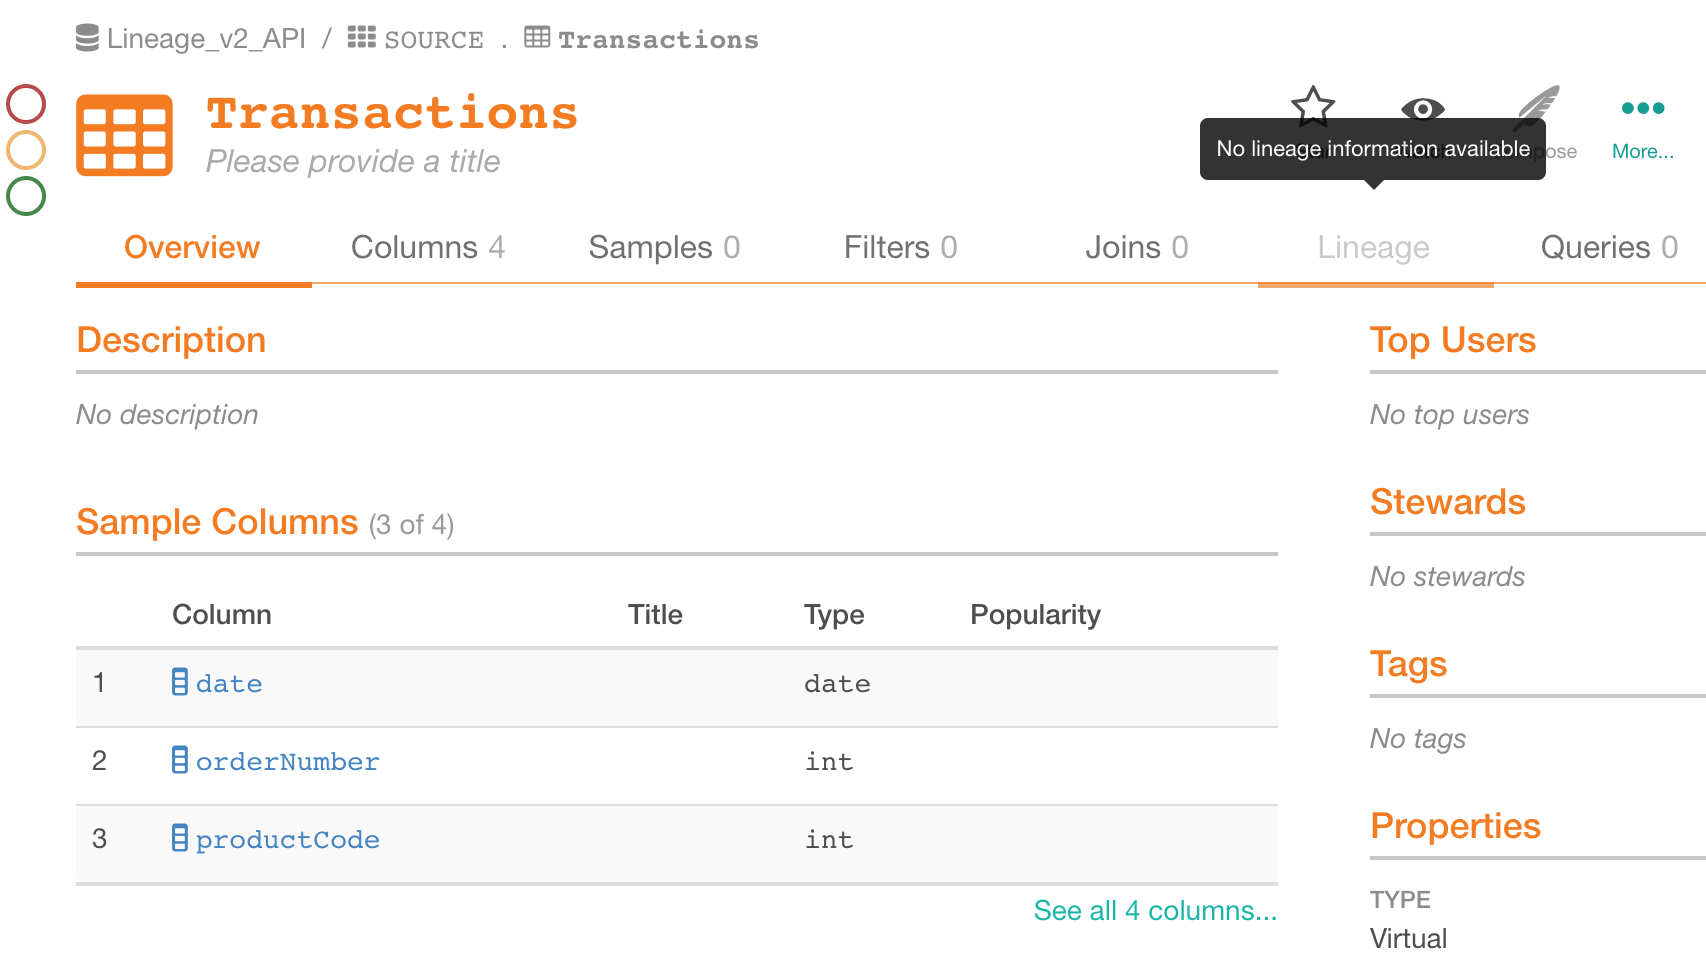
The Lineage tab for the tables will be disabled as no lineage data is available yet:
Setting Up the Job Status Request
Before you proceed, set up a Job Status request using the Job Status API. This will help to troubleshoot any issues:
- In Postman, create a GET request to https:// <DOMAIN>/api/v1/bulk_metadata/job/?id= <JOB_ID>.
- Provide the Token in the Header.
The POST and DELETE requests we are going to make to the Lineage API later will return a job ID in the response that can be used to check on the job status using the Job Status API.
Creating Direct Table to Table Links
Two Tables
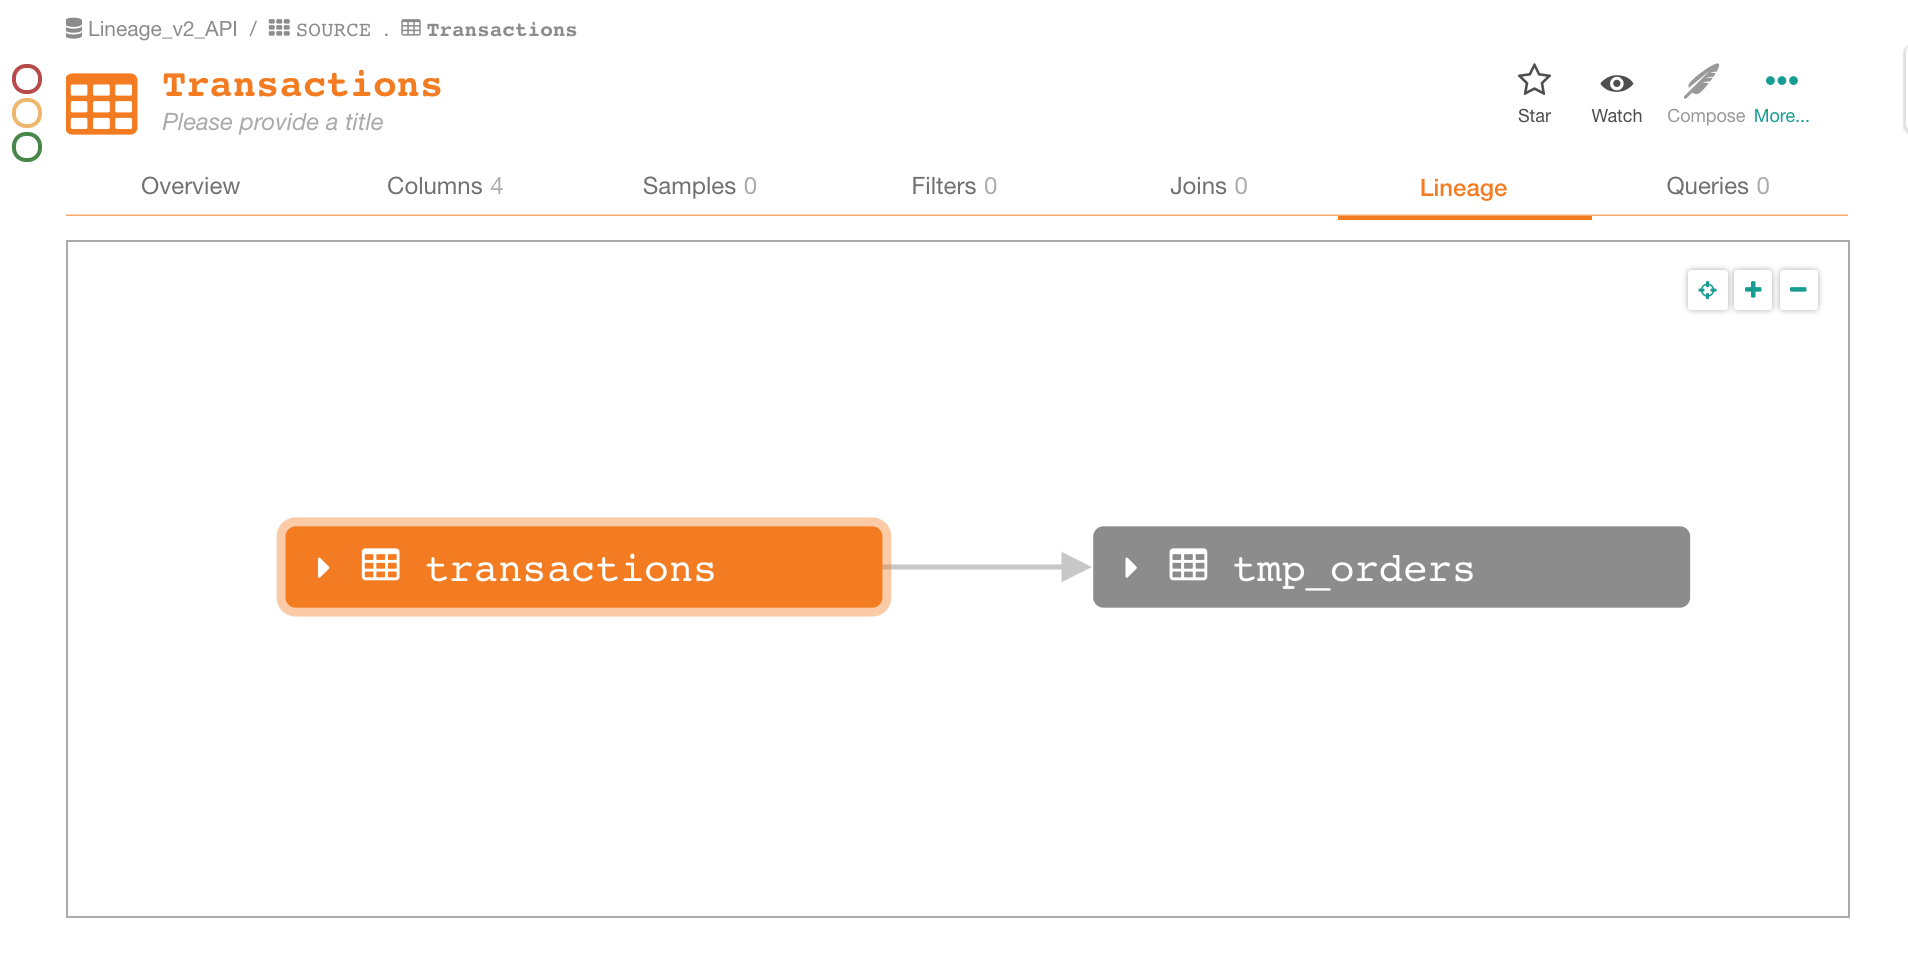
Begin by adding primitive lineage data. Create a direct link between two tables: Transactions and tmp_orders:
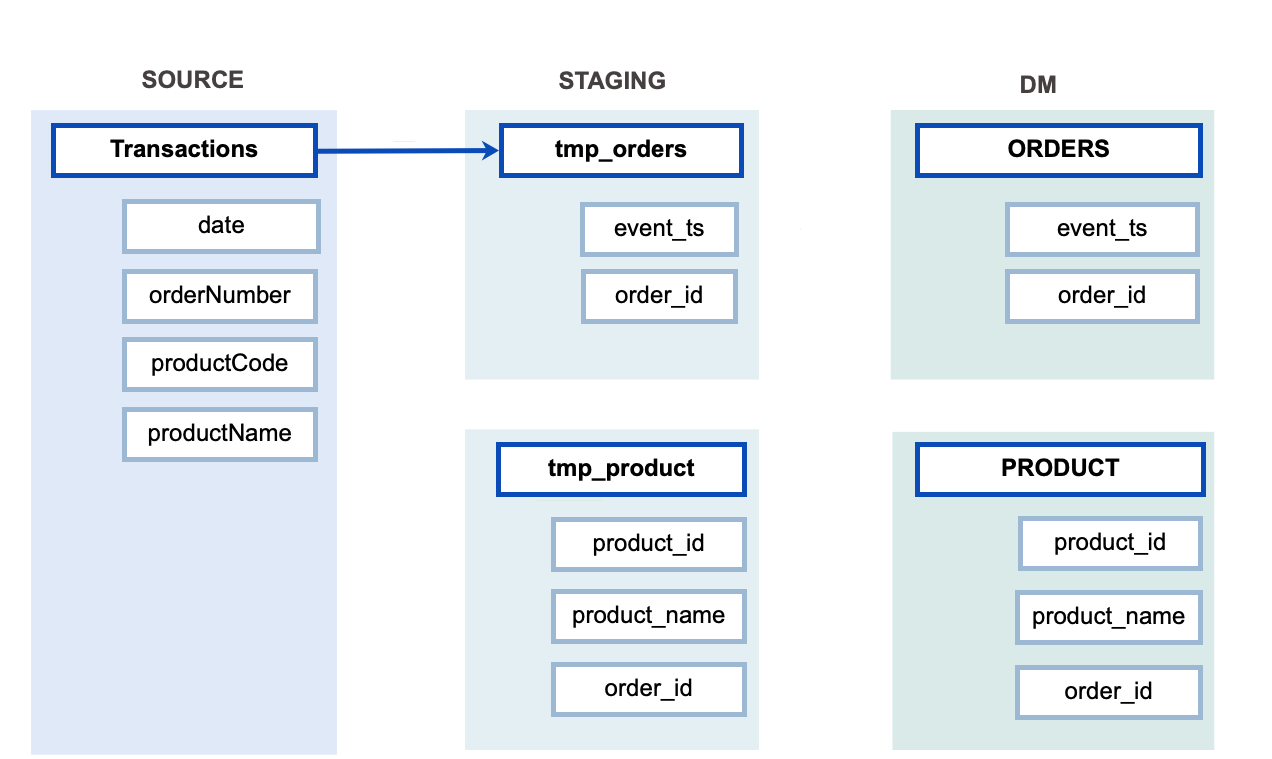
Now we'll be using Lineage API .
Steps
In POSTMAN, create a new POST request, providing the token in the header, to the URL: https:// <DOMAIN>/integration/v2/lineage/:
{
    "paths": [
        [
            [ {"otype": "table", "key":"<DS_ID>.SOURCE.Transactions"}],
            [ {"otype": "table", "key":"<DS_ID>.STAGING.tmp_orders"}]
        ]
    ]
}
This request will create one direct link between the Transactions and tmp_orders tables. It is specified with one path array with two component arrays:
[
     [ {"otype": "table", "key": "<DS_ID>.SOURCE.Transactions"}],
     [ {"otype": "table", "key": "<DS_ID>.STAGING.tmp_orders"}]
]
Each separate array item is a data object (Table in this case), and the data flows from the first array to the next. After sending this POST request, in Alation, you should see a Lineage diagram like this:
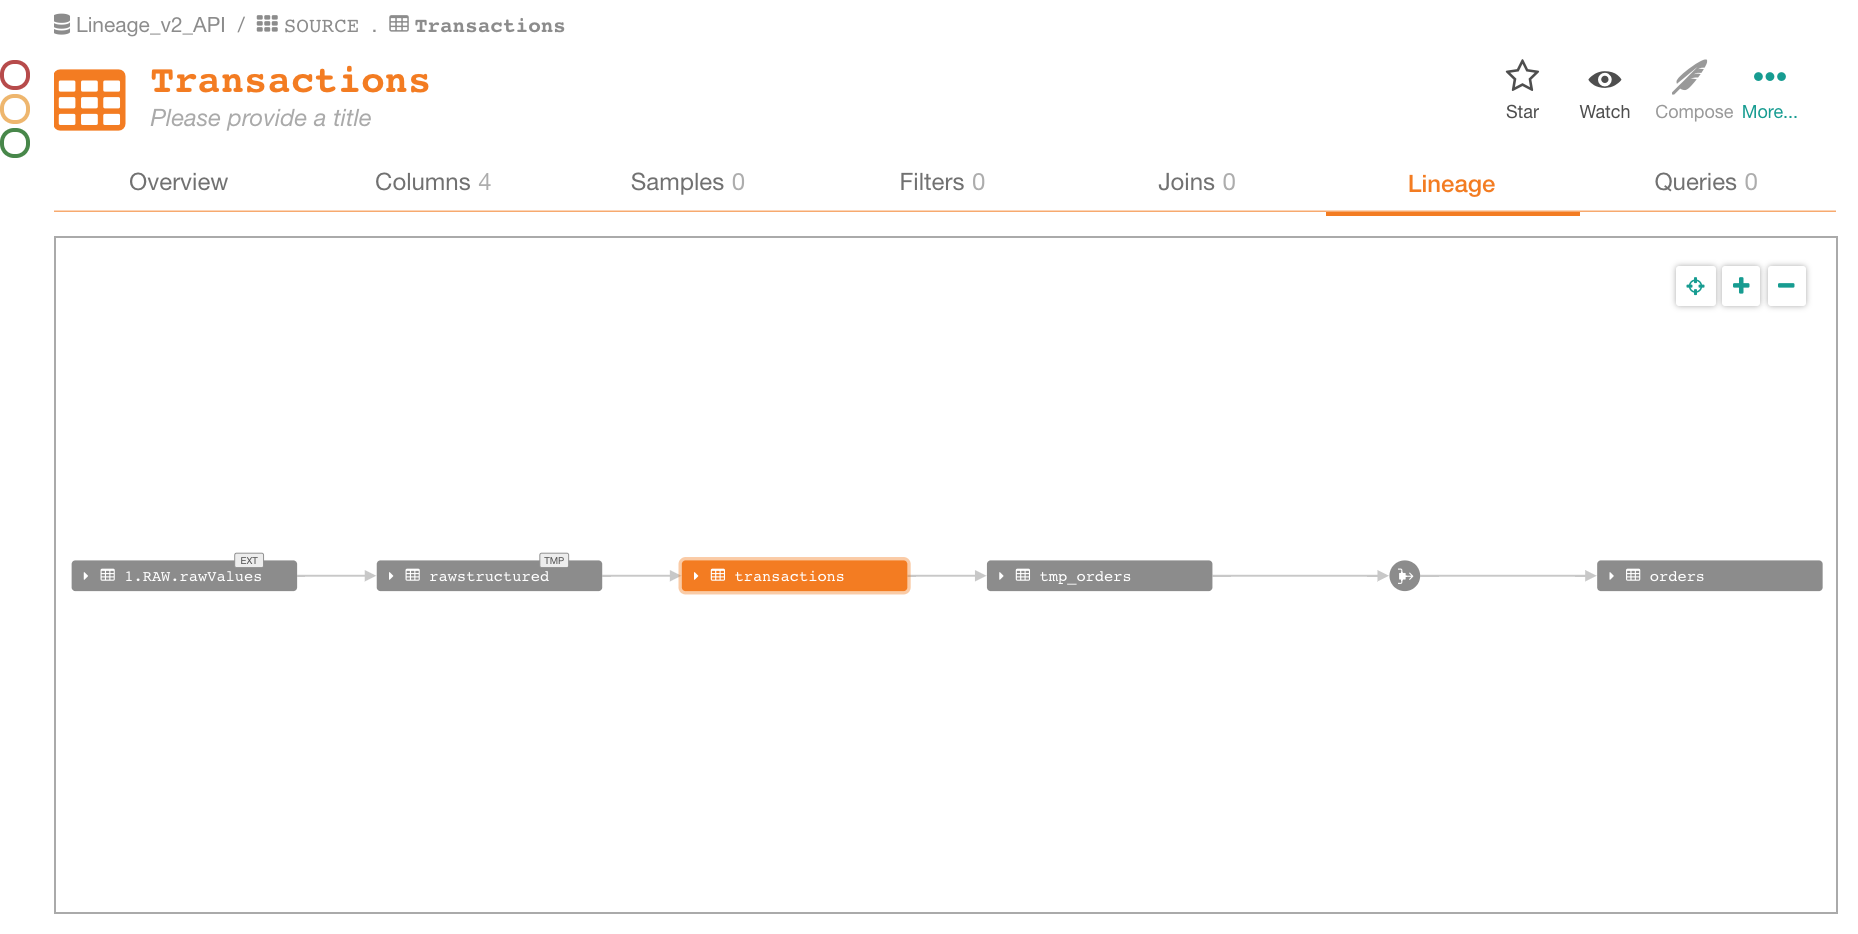
TMP and EXT Objects
Now add something that does not exist in Alation. We will also create linear links between three tables, in one API call. The path array will specify how the data flows from the first to the subsequent tables:
Change the Body of your POST request to:
{
    "paths": [
        [
            [ {"otype": "external", "key": "<DS_ID>.RAW.rawValues"}],
            [ {"otype": "table", "key": "<DS_ID>.RAW.rawStructured"}],
            [ {"otype": "table", "key": "<DS_ID>.SOURCE.Transactions"}]
        ]
    ]
}
After you send this request, in Alation, the lineage diagram will change to:
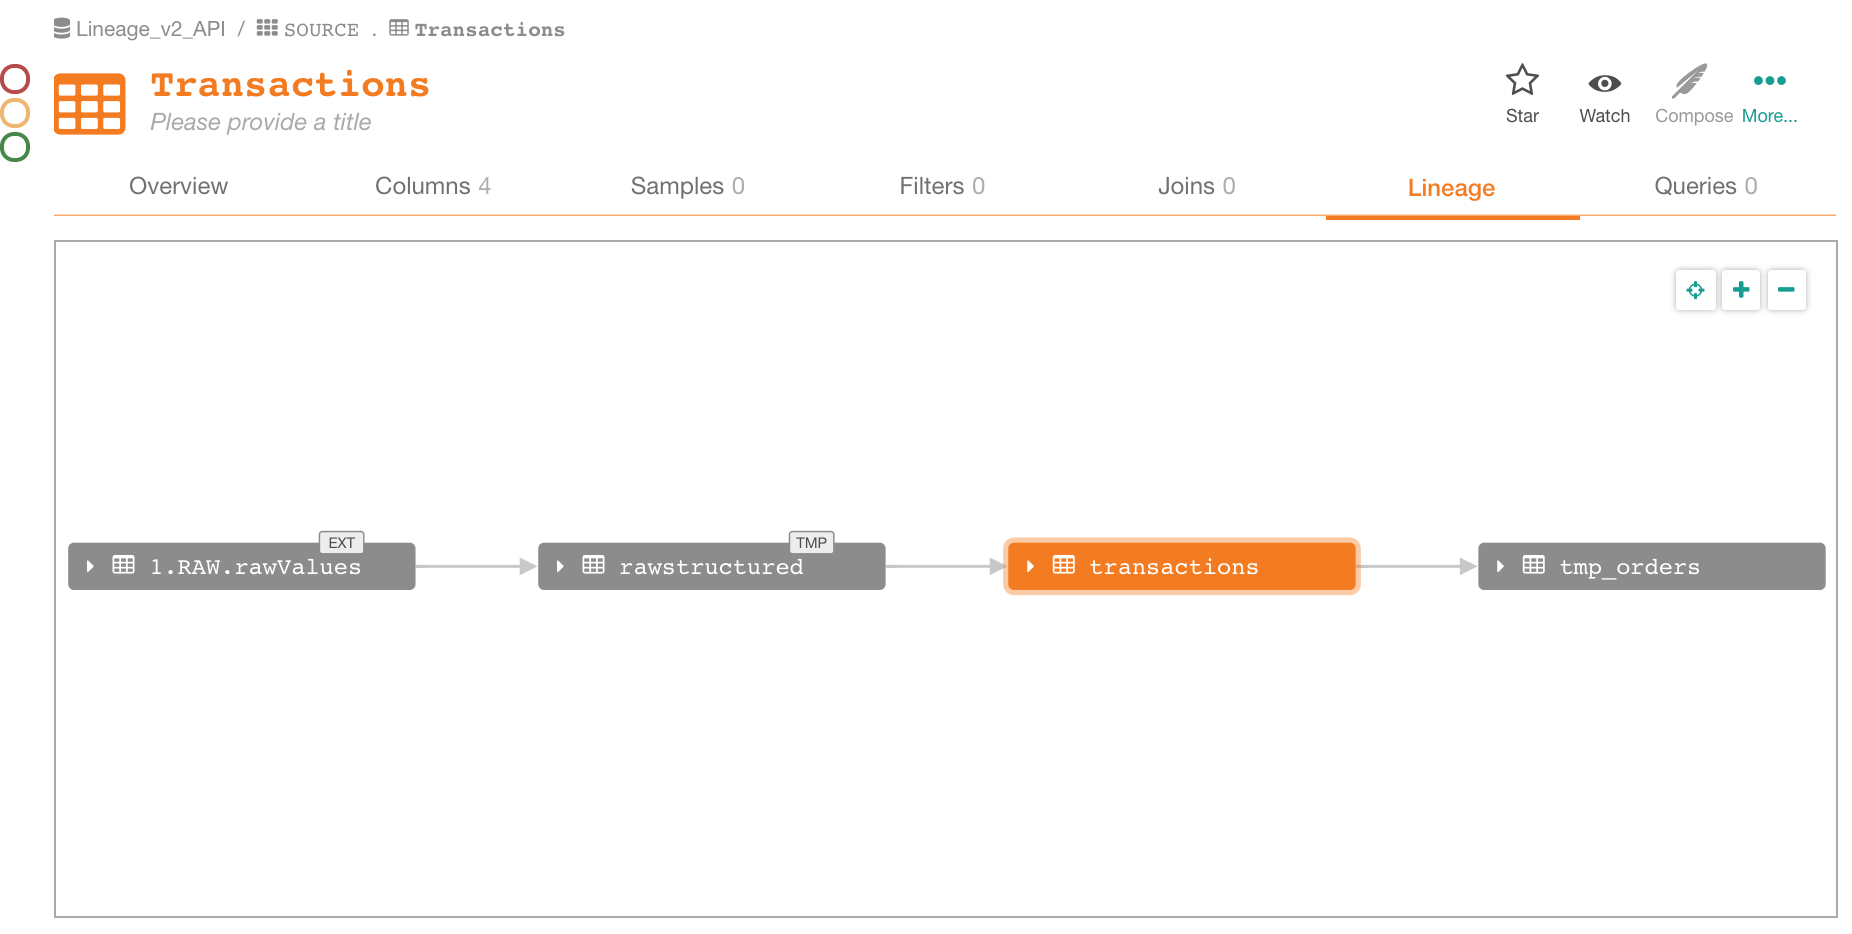
For details about the TMP and EXT badges, see Badges .
Creating Dataflow Objects
Next, add a path between tables temp_orders and ORDERS that goes using a dataflow object:
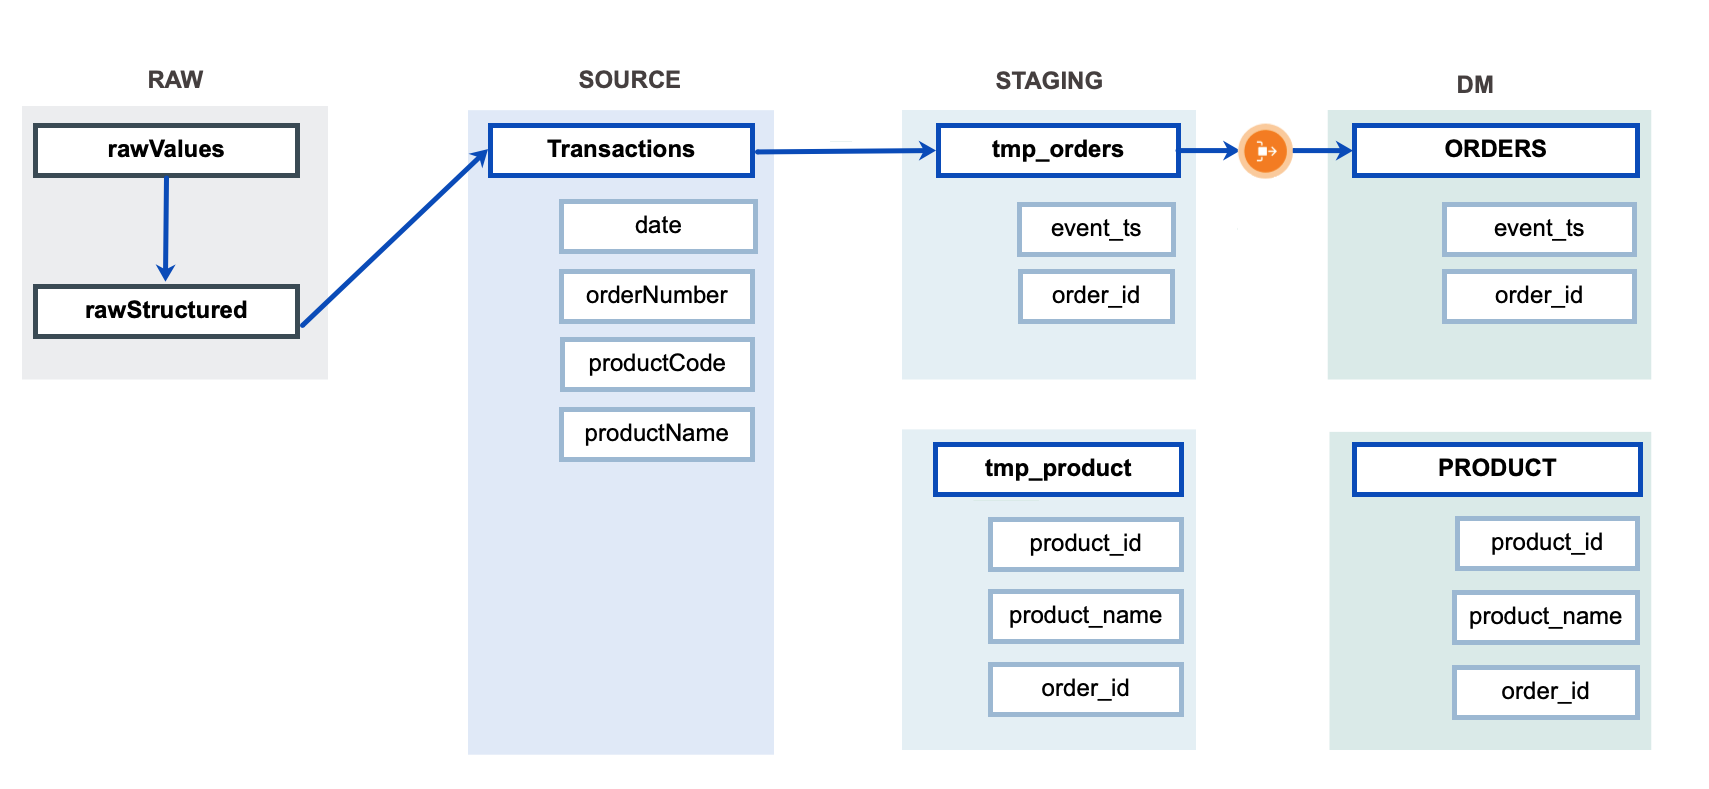
Dataflow objects can be created in a separate API call or in the same call with paths, but they need to be defined before the paths. We are going to create the dataflow object and the path in one API call.
Dataflow objects must be included in the dataflow_objects array that precedes the paths array in the request body. A dataflow object is identified with the external_id parameter that must start with api/.
You can use the POST request from the previous step and change the Body to:
{
    "dataflow_objects": [
        {
            "external_id": "api/tmp_orders_to_orders",
            "content": "Transformation refers to the cleansing and aggregation that may need to happen to data to prepare it for analysis."
        }
    ],
    "paths": [
        [
            [
                {"otype": "table", "key": "<DS_ID>.STAGING.tmp_orders"}
            ],
            [
                {"otype": "dataflow", "key": "api/tmp_orders_to_orders"}
            ],
            [
                {"otype": "table", "key": "<DS_ID>.DM.ORDERS"}
            ]
        ]
     ]
  }
After sending the request, in Alation you will see that the Lineage diagram changed in the following way:
Modifying the Existing Lineage Data
Assume we need to change the lineage data by adding links and dataflow objects between all the tables in Alation. We will also change the RAW part by creating two parallel links to one target table:
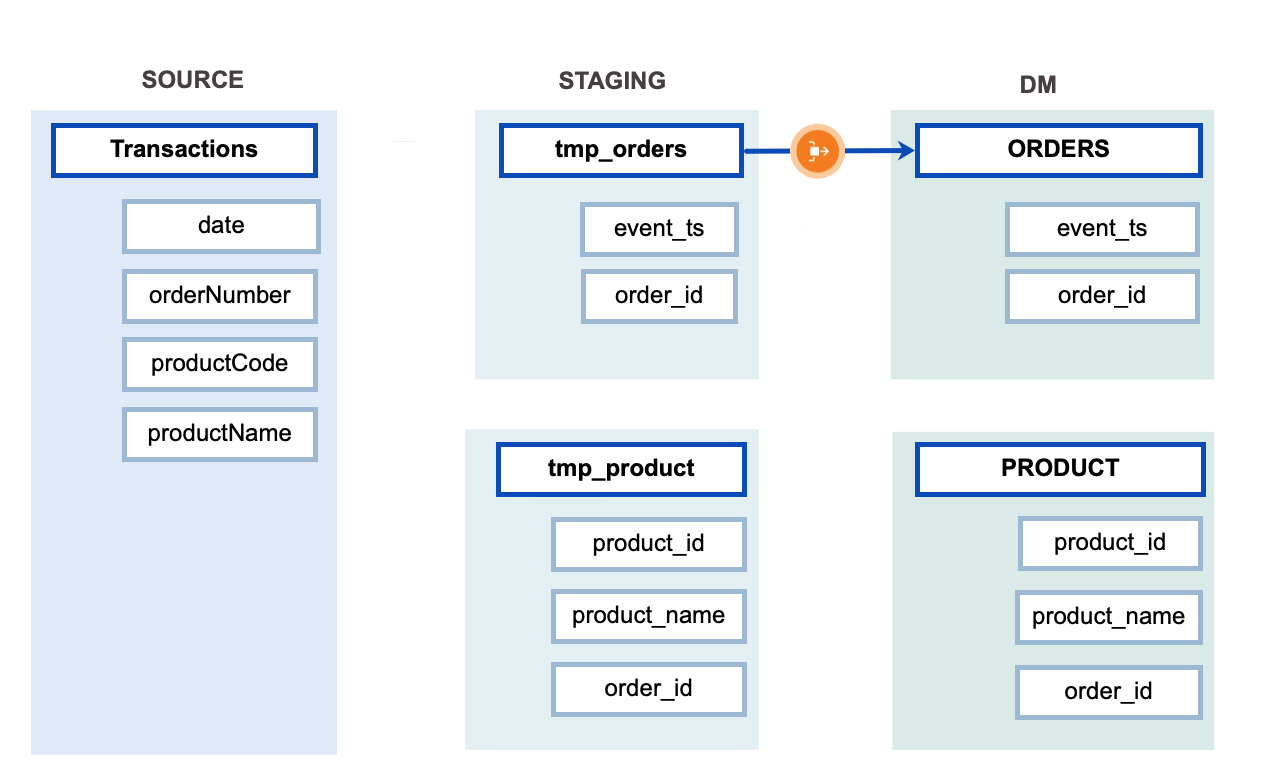
Using the Lineage API, we can only update lineage data by deleting existing links and posting new ones. So first we're going to delete the direct links that we added earlier and achieve the following state in our lineage data in Alation:
Step 1
In Postman, create a DELETE request to /integration/v2/lineage/ specifying the links to be deleted using Parameters. You need to specify each link (each arrow) with 4 parameters: source_otype, source_key, target_otype, target_key. Each link between every two objects has to be described with its source-target parameters. For example, to delete the link that flows between tables<DS_ID>.SOURCE.Transactions and <DS_ID>.STAGING.tmp_orders, you would need to specify four parameters:
- source_otype = table
- source_key = <DS_ID>.SOURCE.Transactions
- target_otype = table
- target_key = <DS_ID>.STAGING.tmp_orders
Remember to add the Token in the Header:

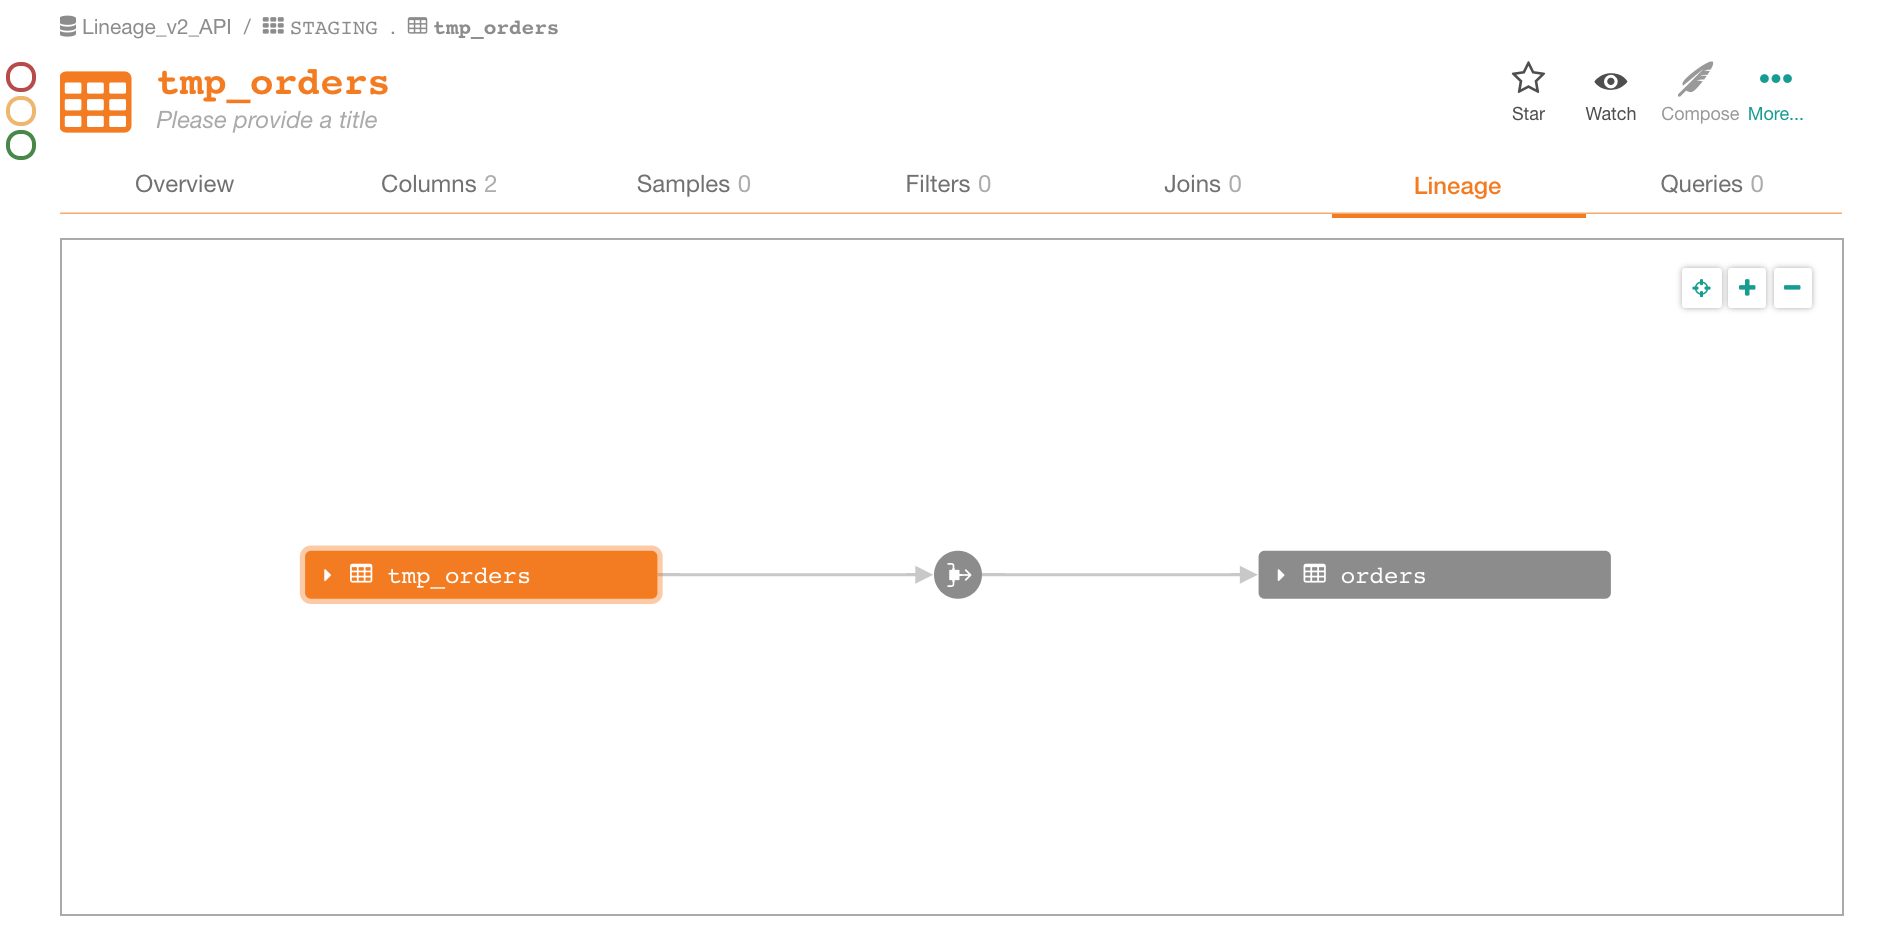
After sending this request, in Alation, you will see that the remainder of the lineage diagram looks like this (accessible from<DS_ID>.STAGING.tmp_orders):
Chain Deleting Lineage
To chain delete lineage, use the Delete Dataflow API by using the id numbers or the unique name of each dataflow.
Step 2
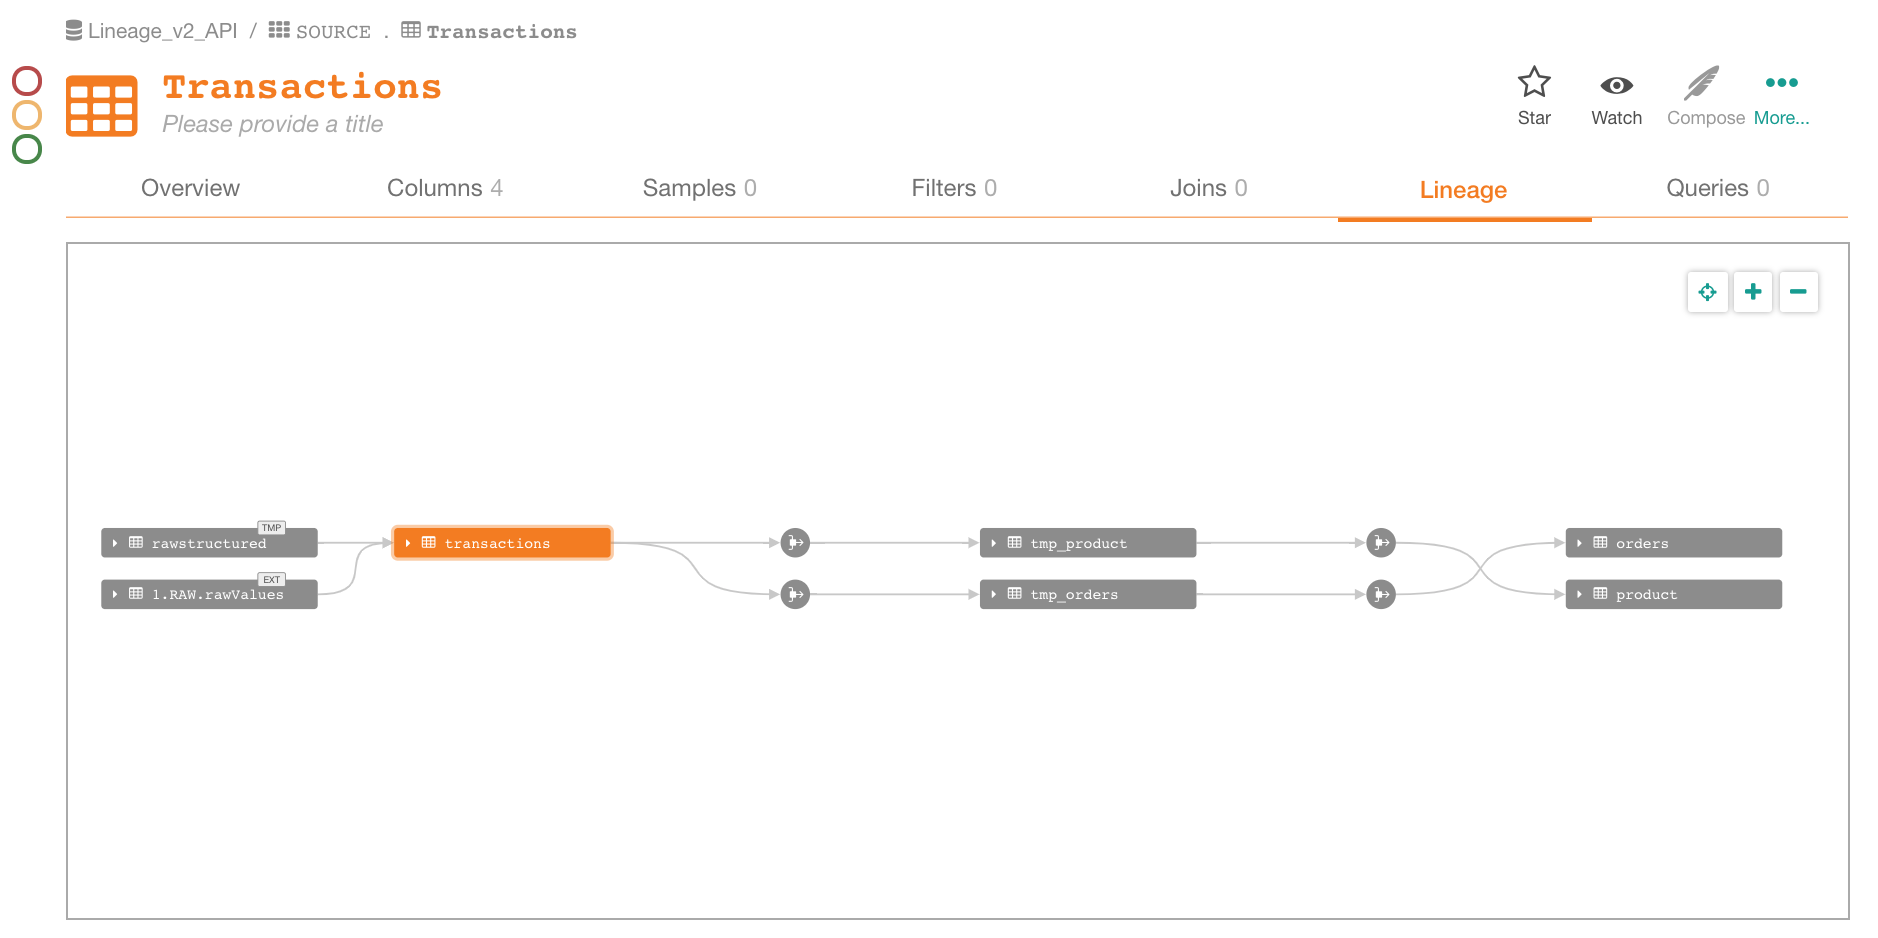
Now upload new lineage data. We will create new dataflow objects and paths in one call.
The part of the path that creates two parallel links from two source tables to 1 target table is specified in one array item:
[
  [
      {"otype": "external", "key": "<DS_ID>.RAW.rawValues"},
      {"otype": "table", "key": "<DS_ID>.RAW.rawStructured"}
  ],
  [
    {"otype": "table", "key": "<DS_ID>.SOURCE.Transactions"}
  ]
]
You can reuse the POST request we already created and change the body to:
{
    "dataflow_objects": [
        {
            "external_id": "api/trans_to_tmp_product",
            "content": "Transformation refers to the cleansing and aggregation that may need to happen to data to prepare it for analysis."
        },
        {
            "external_id": "api/trans_to_tmp_orders",
            "content": "Transformation refers to the cleansing and aggregation that may need to happen to data to prepare it for analysis."
         },
        {
            "external_id": "api/tmp_product_to_product",
            "content": "Transformation refers to the cleansing and aggregation that may need to happen to data to prepare it for analysis."
        }
    ],
    "paths": [
        [
            [
                {"otype": "external", "key": "<DS_ID>.RAW.rawValues"},
                {"otype": "table", "key": "<DS_ID>.RAW.rawStructured"}
            ],
            [ {"otype": "table", "key": "<DS_ID>.SOURCE.Transactions"}]
        ],
        [
            [
                {"otype": "table", "key": "<DS_ID>.STAGING.tmp_orders"}
            ],
            [
                {"otype": "dataflow", "key": "api/tmp_orders_to_orders"}
            ],
            [
                {"otype": "table", "key": "<DS_ID>.DM.ORDERS"}
            ]
        ],
        [
            [
                {"otype": "table", "key": "<DS_ID>.SOURCE.Transactions"}
            ],
            [
                {"otype": "dataflow", "key": "api/trans_to_tmp_product"}
            ],
            [
                {"otype": "table", "key": "<DS_ID>.STAGING.tmp_product"}
            ],
            [
                {"otype": "dataflow", "key": "api/tmp_product_to_product"}
            ],
            [
                {"otype": "table", "key": "<DS_ID>.DM.PRODUCT"}
            ]
        ],
        [
            [
                {"otype": "table", "key": "<DS_ID>.SOURCE.Transactions"}
            ],
            [
                {"otype": "dataflow", "key": "api/trans_to_tmp_orders"}
            ],
            [
                {"otype": "table", "key": "<DS_ID>.STAGING.tmp_orders"}
            ]
        ]
    ]
 }
After sending the request, in Alation, you should see the following lineage diagram:
Column-Level Lineage
Now add column-level lineage data to achieve something like the structure below (with the RAW part out of scope for now):
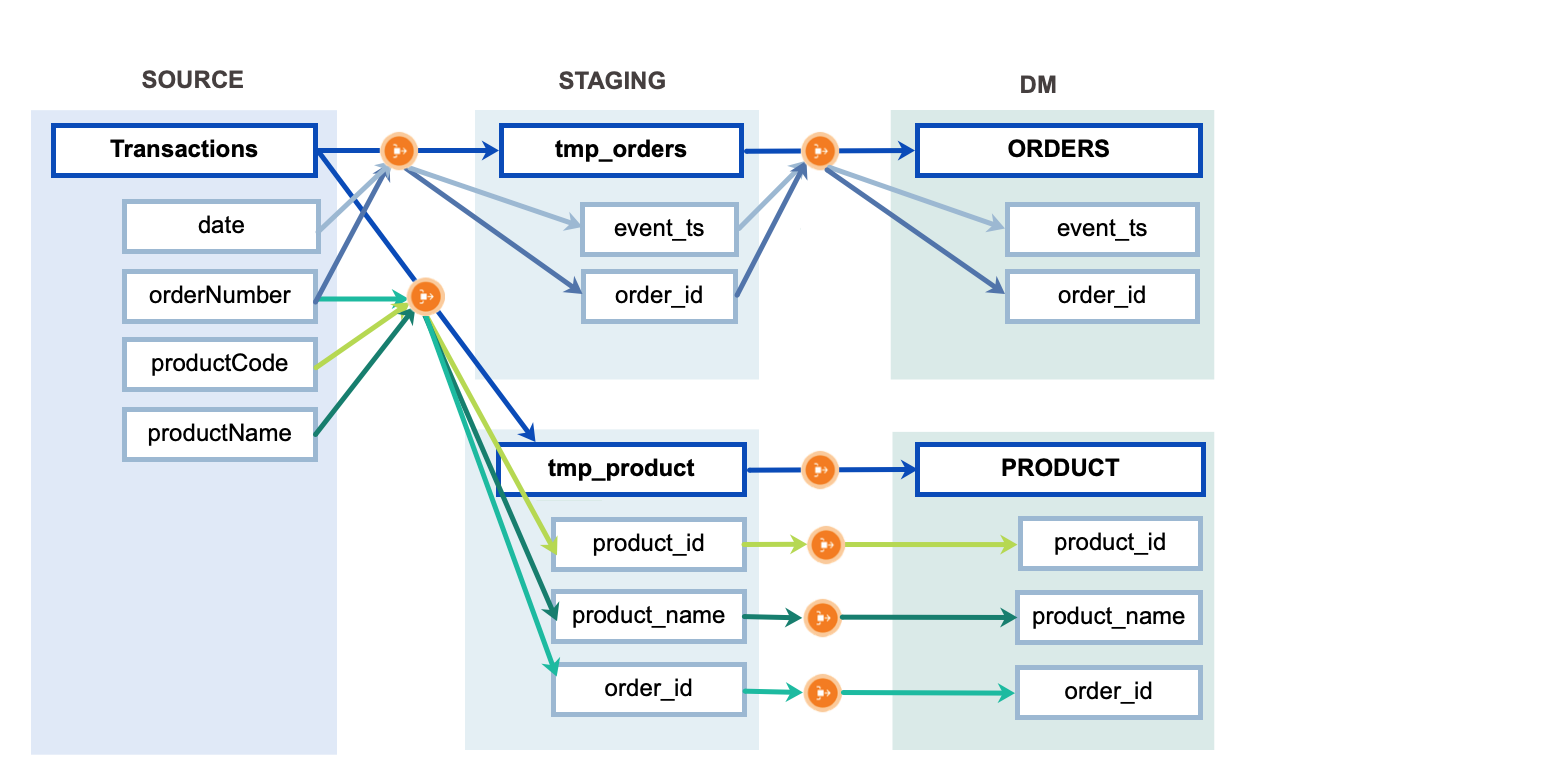
In this lineage data, some of the paths flow through the same dataflow objects created by previous calls, while other paths flow through separate unique dataflow objects.
We will create these new dataflow objects and all the column-level paths.
NoteThe links between table-level objects will be auto-created from column-level data, even if not explicitly provided in the request body.
You can use the POST request from the previous step and change the body
to:
{
    "dataflow_objects": [
        {
            "external_id": "api/transform_01",
            "content": "Transformation refers to the cleansing and aggregation that may need to happen to data to prepare it for      analysis."
        },
        {
            "external_id": "api/transform_02",
            "content": "Transformation refers to the cleansing and aggregation that may need to happen to data to prepare it for analysis."
        },
        {
            "external_id": "api/transform_03",
            "content": "Transformation refers to the cleansing and aggregation that may need to happen to data to prepare it for analysis."
         }
        ],
    "paths": [
        [
            [
                {"otype": "column", "key": "<DS_ID>.SOURCE.Transactions.date"}
            ],
            [
                {"otype": "dataflow", "key": "api/trans_to_tmp_orders"}
            ],
            [
                {"otype": "column", "key": "<DS_ID>.STAGING.tmp_orders.event_ts"}
            ],
            [
                {"otype": "dataflow", "key": "api/tmp_orders_to_orders"}
            ],
            [
                {"otype": "column", "key": "<DS_ID>.DM.ORDERS.event_ts"}
            ]
        ],
        [
            [
                {"otype": "column", "key": "<DS_ID>.SOURCE.Transactions.orderNumber"}
            ],
            [
                {"otype": "dataflow", "key": "api/trans_to_tmp_orders"}
            ],
            [
                {"otype": "column", "key": "<DS_ID>.STAGING.tmp_orders.order_id"}
            ],
            [
                {"otype": "dataflow", "key": "api/tmp_orders_to_orders"}
            ],
            [
                {"otype": "column", "key": "<DS_ID>.DM.ORDERS.order_id"}
            ]
        ],
        [
            [
                {"otype": "column", "key": "<DS_ID>.SOURCE.Transactions.productCode"}
            ],
            [
                {"otype": "dataflow", "key": "api/trans_to_tmp_product"}
            ],
            [
                {"otype": "column", "key": "<DS_ID>.STAGING.tmp_product.product_id"}
            ],
            [
                {"otype": "dataflow", "key": "api/transform_01"}
            ],
            [
                {"otype": "column", "key": "<DS_ID>.DM.PRODUCT.product_id"}
            ]
        ],
        [
            [
                {"otype": "column", "key": "<DS_ID>.SOURCE.Transactions.productName"}
            ],
            [
                {"otype": "dataflow", "key": "api/trans_to_tmp_product"}
            ],
            [
                {"otype": "column", "key": "<DS_ID>.STAGING.tmp_product.product_name"}
            ],
            [
                {"otype": "dataflow", "key": "api/transform_02"}
            ],
            [
                {"otype": "column", "key": "<DS_ID>.DM.PRODUCT.product_name"}
            ]
        ],
        [
            [
                {"otype": "column", "key": "<DS_ID>.SOURCE.Transactions.orderNumber"}
            ],
            [
                {"otype": "dataflow", "key": "api/trans_to_tmp_product"}
            ],
            [
                {"otype": "column", "key": "<DS_ID>.STAGING.tmp_product.order_id"}
            ],
            [
                {"otype": "dataflow", "key": "api/transform_03"}
            ],
            [
                {"otype": "column", "key": "<DS_ID>.DM.PRODUCT.order_id"}
            ]
        ]
    ]
  }
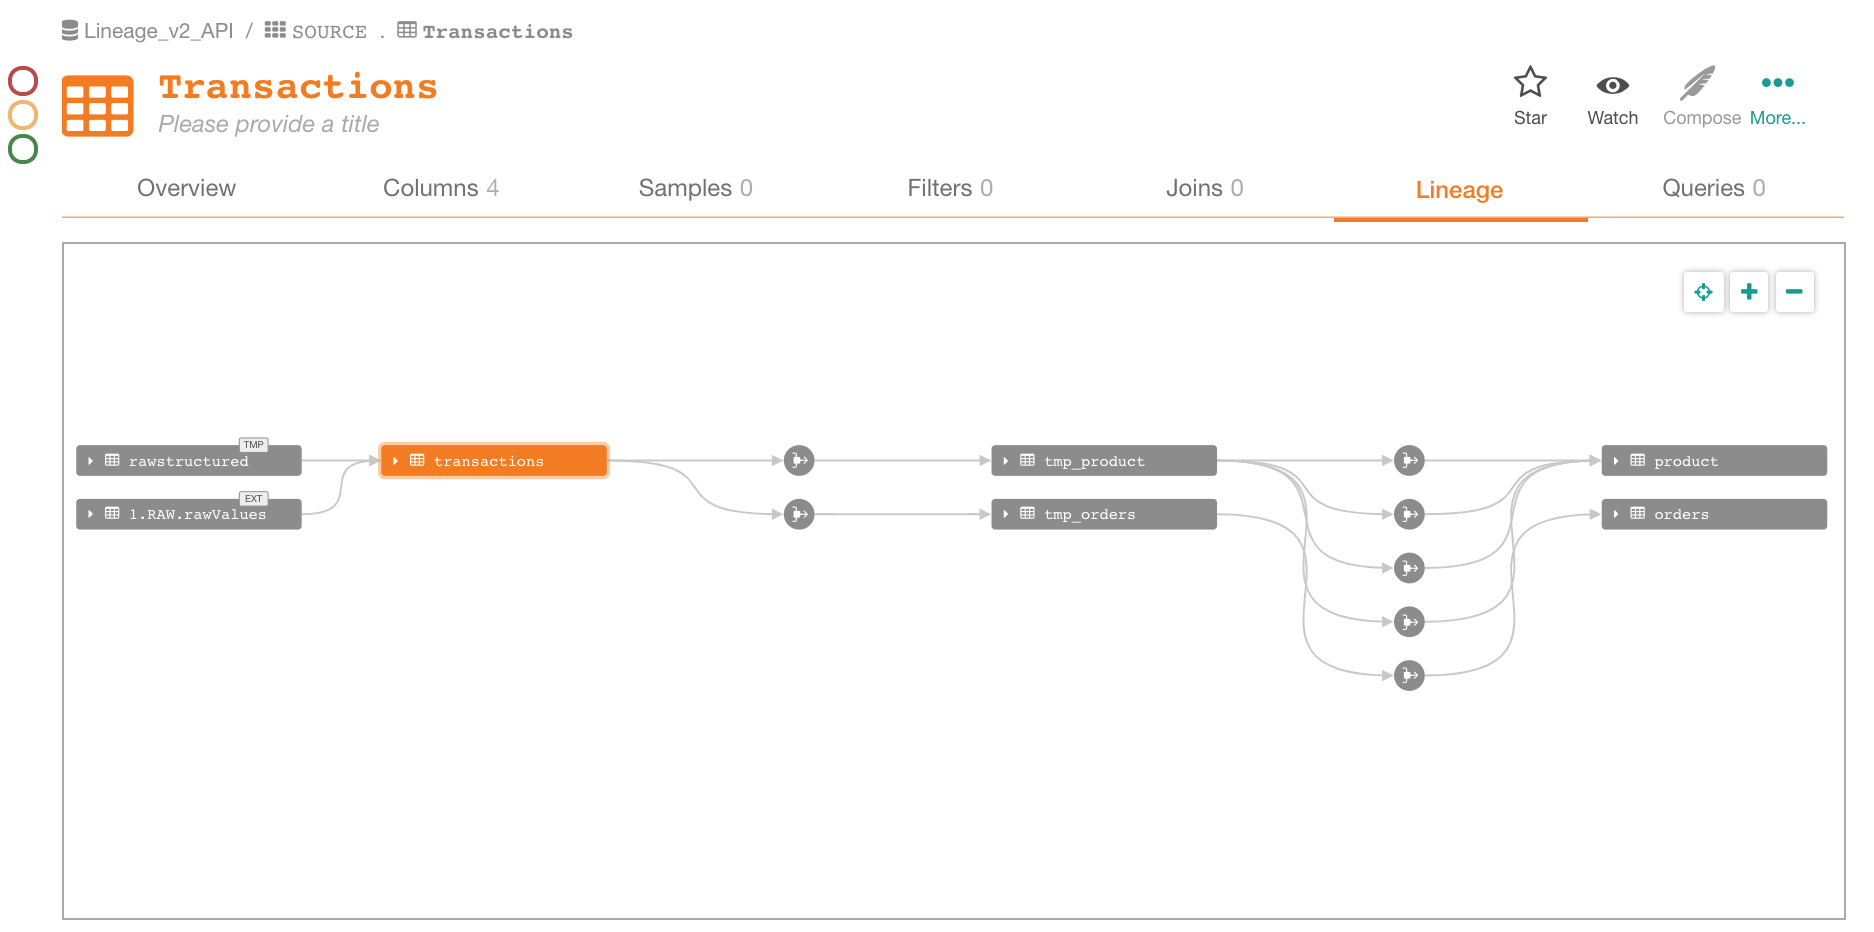
After sending the request, in Alation, you will see:
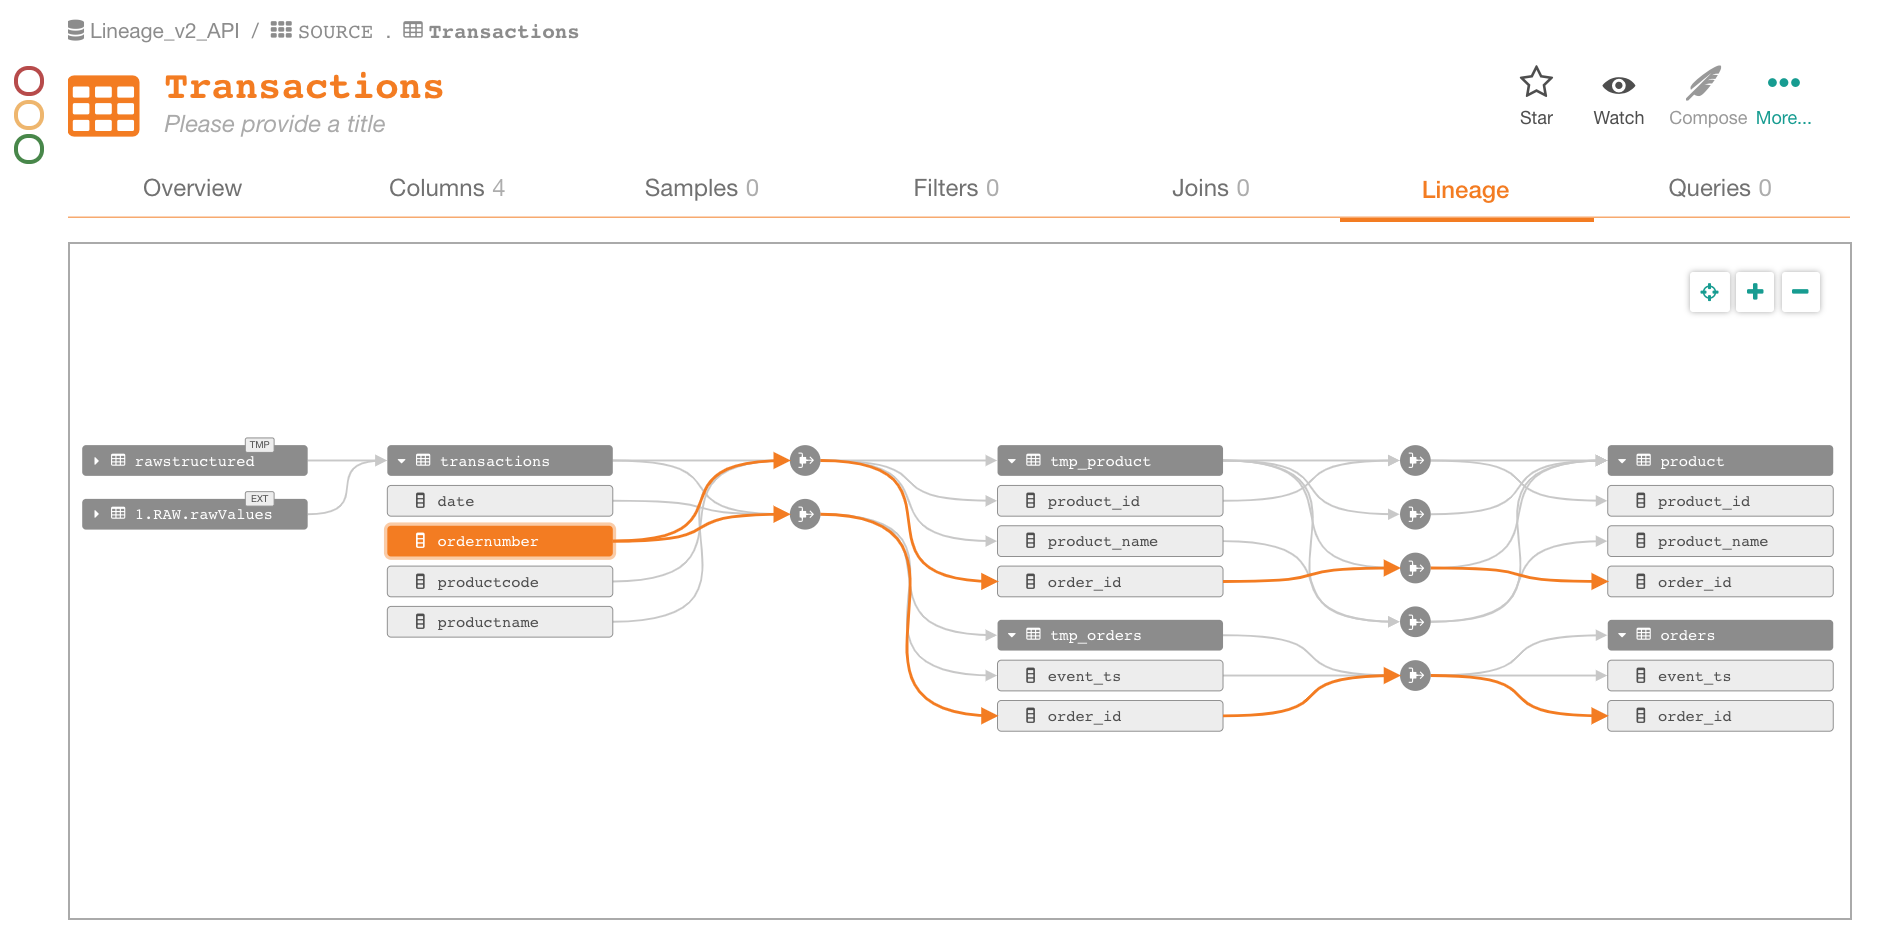
Expanded the view to see the column-level connections:
Using the Lineage v2 API with BI Sources
Lineage v2 API can be used to add lineage data to virtual BI sources.
For each BI data object you use for creating lineage, you will need to
provide the external_id parameter value in the key. These are the ID
values you have provided using the API when first creating your virtual
BI data source. Refer to the documentation you are maintaining for
virtual BI sources to get the external ID values.
Related Topics
Updated 9 months ago